CricketOne: stump shell, bails and makers (rev R)
Owner review, 31 Oct 2026. The owner asked for five things:
- stumps and bails that look like their reference picture (LED-style stumps);
- makers who can build our glass-epoxy (G-10) parts, with our help on the CAD;
- every inside part in a soft case that can be pushed in and pulled out, for battery changes and maintenance;
- printed bails;
- a cheaper way to make the stump shells that IEMI Labs can do itself later.
This page covers all five. The CAD is changed and re-checked (rev R). The parts list is in the first stump.
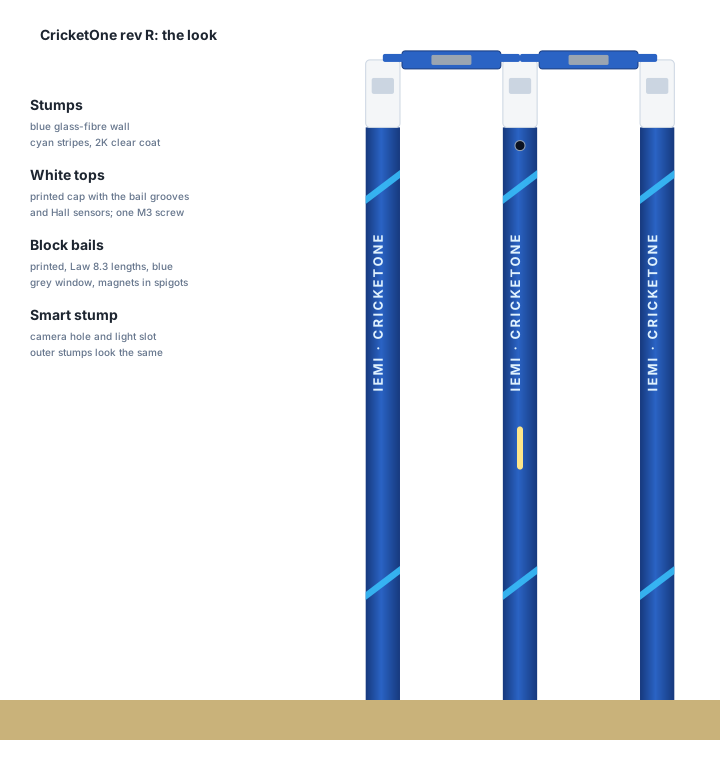
1. The look
| Part | Rev R | How we make it |
|---|---|---|
| Stump wall | Blue, with two cyan stripes and “IEMI · CRICKETONE” running up it | Sand the glass-fibre tube, then spray blue (RAL 5005). Add the stripes and name as printed vinyl, and finish with a 2K clear coat. A printed vinyl wrap works too: one stump takes 0.92 sq ft (row R7, build/cad/wrap/cricketone-wrap.pdf). A wrap or paint adds about 0.3 mm to the diameter (est.), so production tubes are 37.6 mm, not 38.1, to stay inside Law 8.2. |
| Top | A white block, as in the picture | It is our printed cap (PA12, white), with the bail grooves, Hall sensors, O-ring and a screw at the back |
| Bails | Square blue blocks with a grey window on the front and back | Printed (section 3) |
| Smart parts | Only the camera hole (Ø10) and the light slots show | The outer stumps get the same paint, so the three look alike |
We use our own name only. The picture’s brand marks are not copied.
2. The soft case: the whole inside slides in and out
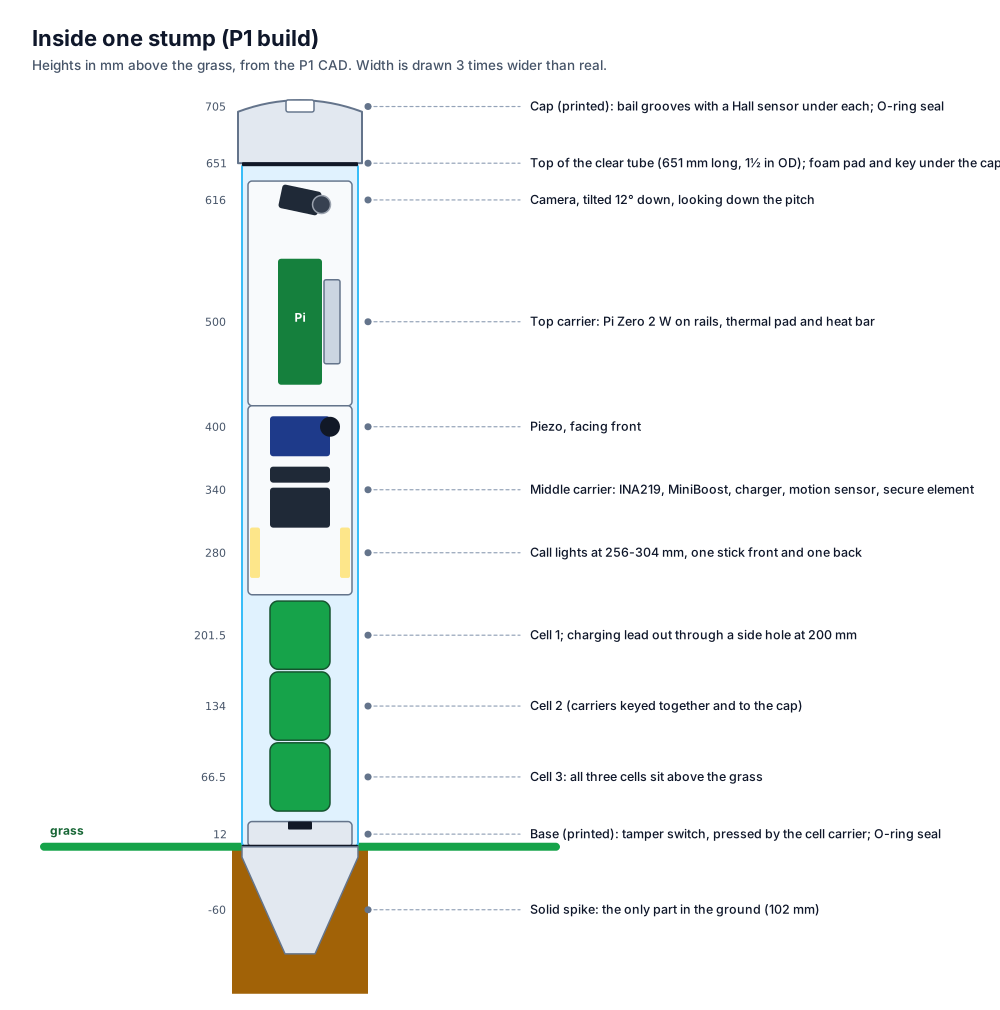
All of the electronics now form one core that slides into the stump from the top.
-
The three carriers (cells, middle boards, Pi and camera) are cut down to Ø28.4. Only their end flanges reach Ø30.6.
-
The soft case: each carrier wears a split sleeve of TPU 95A, a soft rubbery plastic printed in black.
- The sleeve clips on between the carrier’s flanges.
- Eight thin ribs on the sleeve touch the bore with a light 0.075 mm squeeze. The core slides by hand but does not rattle, and the sleeve cushions the boards when a ball hits the stump.
- The sleeves have openings for the lights, the sounder, the camera and the charging lead.
- The Pi’s two long edges pass through slots, because the Pi is 30 mm wide.
-
Pull cord: a Ø2 mm Kevlar cord is tied to a bar at the bottom of the cell carrier. It runs up the open back channel and ends in a loop under the foam pad.
- To take the core out: take out the M3 screw at the back, lift the cap off and pull the loop. The cord lifts the cell carrier, which pushes everything above it out in one piece.
- To put the core back: line the front mark up with the camera hole and push it down on the top carrier until it stands on the base. Fit the cap and its screw.
-
Battery changes: the cell carrier unplugs from the middle carrier at one connector, so a spare charged pack swaps in a minute. Day-to-day charging is still through the lead, without opening the stump.
-
Maintenance: with the core out you can reach the microSD card, the camera, every board and the cells.
-
Tamper: pulling the core lifts the tamper switch. The stump logs it as a signed maintenance event, and the app asks the owner to confirm it.
-
The cap no longer relies on the O-ring alone. One M3 countersunk screw goes through the back of the tube into a heat-set insert in the cap, so a ball strike cannot knock the cap off.
-
What the CAD checks on every run:
- nothing inside reaches past Ø30.6;
- the ribs touch the bore but squeeze it less than 0.15 mm;
- the Pi clears its slots;
- the pull-cord path is open from the anchor bar to the cap;
- the case and carriers do not clash;
- every key still locks when turned 3°.
-
Two bugs the new checks found and fixed:
- the old Pi edge rails reached r 17 mm, past the bore;
- the camera bracket’s corners also reached past the bore.
The Pi now screws to four standoffs on the deck.
3. The printed bails
The bails follow the picture: square blue blocks with a grey window. They keep the MCC Law 8.3 sizes: overall 109.5 mm, barrel 54 mm, spigots 35 and 20.5 mm, and no more than 12.7 mm above the stumps.
| Rev R block bail | Old turned ash bail | |
|---|---|---|
| Section | Barrel 15 × 18 mm with rounded corners, hollow with 2 mm walls; spigots 9 × 8 mm with flat bottoms, so they cannot roll in the groove | Round, Ø15 barrel, Ø9 spigots |
| Rise above the stumps | 10.5 mm (limit 12.7) | about 11 mm |
| Mass | 10.7 g in PA12 with its magnets | 8.4 g (est.) |
| Magnets | Two N52 stacks in each spigot, over each Hall sensor, 2.0 mm from the sensor (unchanged) | The same |
| Window | A 40 × 10 × 1 mm recess front and back, for grey vinyl now; P2 can put an LED behind a clear insert | None |
| Made by | SLS/MJF PA12, dyed blue (or PETG on a lab printer); two Ø3 holes underneath let the powder out | Bought, then drilled |
Three are printed for the first stump: two for the wicket and one spare.
4. Who can make our stump walls
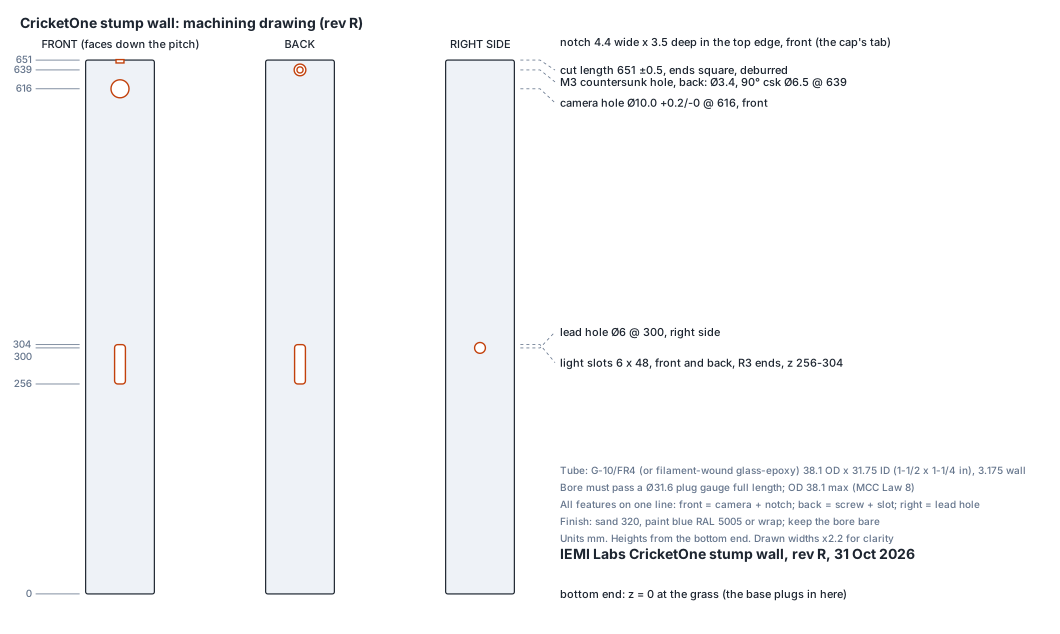
We send each shop the machining drawing below, plus our CAD: STEP and DXF files of the tube, caps and base in build/cad/step/ (row R4), and the STLs. Prices and terms are as listed on 31 Oct 2026. Nobody has been contacted yet.
| Maker | What they do | Fit for us | How to ask |
|---|---|---|---|
| Xometry (US) | CNC parts in G-10/FR4, with an instant quote from CAD | Cutting and drilling a bought tube to our drawing | Upload CAD at xometry.com (G-10 page) |
| Protolabs Network / Hubs | G-10 CNC with a free design check | The same | hubs.com G-10 |
| The Gund Company (US) | Filament-wound glass-epoxy tube made to customer drawings, including black | Best hoop strength for ball strikes; custom tube to our size | Email a quote request with the drawing (data sheet) |
| Electrowind (Canada) | G-10 tube, custom machined | Yellow stock; minimum 4 pieces; the buyer pays duties | electro-wind.com |
| Xiangcheng Chengrui (China) | Moulded epoxy-glass cloth tube (grade 3841) | Blue available, minimum 1 piece | made-in-china listing |
| Max-Gain Systems (Georgia, US) | Pultruded fibreglass tube, 1.5 in OD × 1/8 in wall: the same size as our G-10 | About 30 times cheaper than G-10 (section 5) | mgs4u.com |
| Liberty Pultrusions (US) / Longtime FRP (China) | Pultruded tube in custom colours, including blue | A blue tube for production runs | Liberty, Longtime |
How we help them with the CAD. Every shop gets the same pack:
- the machining drawing above;
- our CAD of the tube and the parts that fit in it (
build/cad/stl/); - the checks the tube must pass:
- a Ø31.6 plug gauge goes through the full length;
- the outside is 38.1 mm at most;
- all features line up front, back and side.
The STEP and DXF files come from the same numbers as the drawing and the drilling jig (row R4, build/cad/maker-files.mjs checks this on every run). We also review their first article against the drawing before paying for more.
Getting the stumps to us (Austin, 78717):
- From the US: a 42-47 in tube ships by UPS or USPS. Expect about $15-30 a box (est.).
- From China: express courier costs about $40-80 for a long box and takes 5-10 days (est.). Sea freight takes 4-6 weeks and suits bulk orders only. US tariffs on Chinese goods may apply, so check before ordering.
- To compare with LED stumps already on sale, we can buy a set as a reference:
- the Protos Flash LED stumps were $124.99 on sale (topcricketstore);
- Zing’s backyard bails are about £29 a pair.
5. Cheaper shells we can make in IEMI Labs
A stump has to survive a 156 g ball at up to 40 m/s, about 125 J. Poured resin on its own is far too floppy: urethane has a modulus of 1-2 GPa, against about 10 GPa for ash. So every cheap route keeps a glass-fibre tube as the structure and makes the look and the ends around it.
| Step | What | Cost per stump (est.) |
|---|---|---|
| 1. Tube | Pultruded fibreglass 1.5 × 1/8 in (Max-Gain), cut to 651 mm on our mitre saw. It has about 88 % of a solid ash stump’s bending stiffness (est., our calculation). | about $3 |
| 2. Holes | Drill and file to the drawing, using a printed drilling jig that clamps on the tube so every stump is the same | jig once |
| 3. Look | Spray blue, add printed vinyl stripes and name, then a 2K clear coat (SprayMax 2K, about $26-38 a can, covers several stumps) | about $3-5 |
| 4. Top and base | Print them now. Later, cast them in our own silicone mould: Mold Star 30 silicone ($37.31 trial) with Smooth-Cast 65D or Task 16 impact-resistant urethane, tinted white | about $1.50 cast |
| 5. Later: a poured blue skin | Overmould a 1-2 mm blue urethane skin on the tube in a split silicone mould, pigmented, with no paint. The mould costs about $150-250 once. | about $3-5 |
| Shell total | about $10-13 a stump against $160.94 for one G-10 tube from McMaster |
One risk to test first. Pultruded tube has most of its fibres along its length. A point impact can split it lengthwise (est.), while woven G-10 and filament-wound tube resist that. Before we commit, we drop-test and ball-test both: one pultruded offcut and one G-10 offcut (row R3).
Is a glass-fibre stump allowed?
- MCC Law 8.1 describes the stumps as wooden.
- ICC playing conditions (clause 8.5) allow “approved LED Wickets”, and leagues can write the same into their own playing conditions.
- So a glass-fibre CricketOne stump is fine for training, nets and leagues that approve it. A match under the Laws alone needs the competition’s approval. This is the same position as the LED stumps already in use.
6. Rev R rows (the 30-minute lab runs work through these)
| Row | Work | Output |
|---|---|---|
| R1 | Bench-program the Pi Zero 2 W and camera (B1: 120 fps at 1280 × 800 while encoding 720p) | B1 result in DESIGN.md. 31 Oct 2026: the software is ready in products/cricketone/software (README has the steps); the result comes when order 1 arrives |
| R2 | Print one case sleeve on the lab printer in TPU and slide it into the G-10 offcut: check the pull force and rattle | Measured pull force |
| R3 | Drop and ball tests on G-10 and pultruded offcuts | Pick the production tube. 1 Nov 2026 (row R46): rev S buys pultruded tube, about 5 times weaker crosswise than G-10 (est.), so the first stump is the pultruded test; t1_test.py --rev s and drop_test.py --rev s run the rev S plan (98 hits, head last); finding: a ball on the head breaks the printed spigot (row R47); DESIGN.md “### R46”. Row R47: the lower head becomes a 6061-T6 collar, and the tube at the back button hole is next (×0.56 at 40 m/s, est.), so R48 moves the hole to the side |
| R4 | Make STEP and DXF of the tube and caps for makers | build/cad/step/. 31 Oct 2026: done, build/cad/maker-files.mjs writes tube.step, cap-middle.step, cap-side.step, base.step, tube.dxf (flat pattern), cap.dxf and base.dxf (29 checks pass); DESIGN.md “### R4” |
| R5 | Printed drilling jig for the tube | Jig STL. 31 Oct 2026: done, build/cad/drill-jig.mjs writes jig-top, jig-mid and jig-foot (22 checks pass); DESIGN.md “### R5” |
| R6 | Mould plan for the cast white top (Mold Star 30 + Task 16) | Mould CAD. 31 Oct 2026: done, build/cad/cap-mould.mjs writes cap-master-middle, cap-master-side, mould-box-a, mould-box-b, mould-lid and hall-drill-guide (45 checks pass); DESIGN.md “### R6” |
| R7 | Vinyl wrap artwork (blue, cyan stripes, name), sized to the 38.1 mm tube | Wrap PDF. 31 Oct 2026: done, build/cad/vinyl-wrap.mjs writes wrap/cricketone-wrap.pdf (130.2 x 657 mm, CutContour cut-outs) and the SVG (24 checks). Finding: the wrap makes a 38.1 tube 38.40 mm, over Law 8.2, so production asks for a 37.6 mm tube; DESIGN.md “### R7” |
| R8 | Bail-off and soak bench programs: the bail rule, a 240 fps phone timing check against P18, and the 2-hour soak and charge log with pass marks | 1 Nov 2026: done, software/bail_test.py and software/soak.py (each with --selftest), checked by sim/bench-r8.mjs (20 checks); first stump est. 2.87 W at full rate, 2.20 W at match duty: a T20 evening in every case, a 50-over day with new cells only; DESIGN.md “### R8” |
| R9 | Knock and drop test program: the drop steps, what each inside part feels, and pass marks after every fall | 1 Nov 2026: done, software/drop_test.py (--selftest), checked by sim/drop-r9.mjs (21 checks); four steps from a 0.5 m drop onto a mat to a 1.0 m drop onto turf; the sensor’s own wake-up flag catches the 2-3 ms landings the Pi’s reads miss; flat drops onto turf go past the cells’ rated shock, so they come last; DESIGN.md “### R9” |
| R10 | Ball-hit test T1 program: the 93 Q13 hits, marks 1-4 on the stump, mark 5 from a 240 fps phone film, and a knock flag that sees a 1 ms hit | 1 Nov 2026: done, software/t1_test.py (--selftest) and the knock fix in software/guard.py, checked by sim/t1-r10.mjs (12 checks); the Pi alone never sees a ball hit, the sensor’s wake-up flag sees every one; a 240 fps film measures the thrown speed to 5.6-9.1 %; DESIGN.md “### R10” |
| R11 | Clip keeper: the 10 s 720p clip and a 120 fps review strip around every bail-off, knock, unsure call and app request, and the microSD speed it needs | 1 Nov 2026: done, software/clip_keeper.py (--selftest, --sd-test), checked by sim/clip-r11.mjs (13 checks); 294.3 MB of the Zero’s 512 MB; the strip is on the phone 6.7 s after the trigger; the card must write 18.6 MB/s or more; DESIGN.md “### R11” |
| R12 | Signed calls and the phone link: every call as a signed, hash-chained line, a head line every over, and the phone reading calls and clips over the stump’s Wi-Fi | 1 Nov 2026: done, software/call_link.py (--selftest, --link-test), checked by sim/link-r12.mjs (16 checks); every edit, deleted or swapped line, forged signature and re-signed log is caught, a cut tail only with the head the phone saw; a call is on the phone about 0.18 s after the stump decides (est.); the Pi Zero 2 W has no secure boot, so the first stump is a test stump; DESIGN.md “### R12” |
| R13 | The match program: the bench programs joined into one stump, with one camera owner, the router between bails, knock, tamper, camera and calls, and services that restart by themselves | 1 Nov 2026: done, software/stump.py (--selftest) and software/systemd/ (eyes, stump, calls), checked by sim/stump-r13.mjs (21 checks); only clip_keeper.py opens the camera in a match; about 347 MB of 496 MB (est.); a bowled ball is settled by the bails; DESIGN.md “### R13” |
| R14 | Day-one set-up and preflight: setup.sh installs every library and tool the programs use, I2C and SPI on, the bail lines on either libgpiod API, and a preflight check before B1 |
1 Nov 2026: done, software/setup.sh, software/preflight.py (--selftest) and software/gpio_edges.py, checked by sim/preflight-r14.mjs (24 checks); the old set-up installed 4 of 11 outside libraries and never turned on I2C or SPI, and the bail programs would have failed on Trixie; DESIGN.md “### R14” |
| R15 | Lens calibration for the first camera: P17’s 0.05 px lens step, with a home-printed board | 1 Nov 2026: done, software/lens_cal.py (--capture, --solve, --selftest), checked by sim/lens-cal-r15.mjs (13 checks); held by hand it leaves 0.16 px in the worst 1 of 20 runs, an A3 board on a stand with 25 tilted poses and 10 frames each leaves 0.047 px after the re-aim; the 79° lens needs all five distortion terms; DESIGN.md “### R15” |
| R16 | Heat in the first stump: the Pi Zero 2 W under the heat bar in the TPU soft case and blue G-10 tube, against the R8 soak’s 75 °C and match days in the sun | 1 Nov 2026: done, sim/thermal-revr.mjs (10 checks); as drawn the Pi reaches 80.6 °C in the soak at 20 °C air and fails; the bar’s round face on a 1 mm TP-3 strip through a sleeve window to the bore gives 54.1 °C at 25 °C, with nothing to buy; in the sun the paint sets the limit (ordinary blue: cells at 55 °C at about 29 °C air; cool blue about 36 °C); DESIGN.md “### R16” |
| R17 | Draw R16’s heat bar to the bore in the P1 CAD (bar 16 x 11.5 with a round face, TP-3 strip, case-top window, carrier seats) | 1 Nov 2026: done, build/cad/cricketone-p1-cad.mjs draws the bar as the rod with three flats (37.2 g), the strip under one layer of Kapton (squeezed 17.8 % on the bore over 1341 mm²) and a 16.6 x 81 window in case-top; new case-top.stl; sled-top unchanged (same seats); a ball hit now pushes the bar about 35 % harder into its seats (est.); DESIGN.md “### R17” |
| R18 | Seat load for the heavier heat bar: the R17 bar is 37.2 g (was 27.6), so the Q13 knock load on the top carrier’s seats rises about 35 % (est.); check the seats and the Pi’s 0.85 mm pad gap in a cap-height hit, and the pad strip’s push on the core | 1 Nov 2026: done, the P1 CAD measures every hold and sim/seat-r18.mjs (9 checks) steps the bar in T1 hits; the Pi stays 0.74 mm clear; top cheeks and four end lugs added (new sled-top print); finding: a front hit lands the bar back on the 28 mm² top seats at about 41 MPa (mark 24, est.), so R19; DESIGN.md “### R18” |
| R19 | The bar’s lift in a front hit: stop it or soften and widen the landing on the top seats, inside the ribbon gap | 1 Nov 2026: done, a printed bridge past each end of the bar and an M3 x 16 screw into each end (new sled-top print; order 2 adds 2 screws and an M3 tap); sim/lift-r19.mjs (9 checks) models both ends: R18 as drawn 34.9 MPa on the top seats, one screw lets the bar pivot (0.80 mm lift), both screws 0.07 mm lift and 17.8 MPa worst (mark 24); bridges 23.4 MPa, thin margin; DESIGN.md “### R19” |
| R20 | Day one on a fresh Raspberry Pi OS Lite: every pip and apt package installs on the Pi, every self-test loads alone, set-up’s log comes back | 1 Nov 2026: done, sim/day1-r20.mjs (15 checks); cryptoauthlib (no ARM wheel, needs cmake) now builds alone and only warns, so it can no longer stop Blinka and the drivers installing; setup.sh writes ~/setup-log.txt and day1.sh sends it back; DESIGN.md “### R20” |
| R21 | The camera hole from Monday’s lens measurement: the board on its real 12° tilt in the case, the lens height that keeps Ø10, and a table for the owner | 1 Nov 2026: done, sim/lens-hole-r21.mjs (9 checks); the tilted board’s corners reached through the TPU case (r 15.81), so case-top gets two corner windows and the board face moves back to y 7.3 (new case-top and sled-top STL); a Ø7-8 lens 7.5 mm or taller keeps Ø10, shorter ones need Ø11-12.5, an M12 lens Ø14.5; DESIGN.md “### R21” |
| R22 | One camera module for both bench boards: Picamera2 on the Pi, plain V4L2 on the Radxa, B1 through it, and what the Radxa’s OV9281 driver gives | 1 Nov 2026: done, software/camera.py, sim/camera-r22.mjs (15 checks); the Radxa driver sends 10-bit only and always picks its 30 fps mode, so the Radxa shows about 30 fps until R23; DESIGN.md “### R22” |
| R23 | The Radxa’s 120 fps mode: a small driver change built against Radxa OS’s kernel headers | 1 Nov 2026: done, software/radxa/ov9281-120fps.patch and build-ov9281.sh (our ov9281_iemi, 120 fps at 1280 x 800, built on the board), set-up and day one updated; sim/driver-r23.mjs (18 checks); found the ZERO 3W’s Radxa OS kernel (5.10.160-39) has no OV9281 driver at all; DESIGN.md “### R23” |
| R24 | The camera overlay against the ZERO 3W’s 5.10 device tree: every node and label our two overlays use exists in Radxa’s 5.10 rk3566 and ZERO 3 device tree, and the camera path is the one that kernel has | 1 Nov 2026: done, sim/overlay-r24.mjs (20 checks) against both real 5.10 boot files: every label there, no pin clash, same route as Rockchip’s board; the CSI-2 host input got its lane count; radxa_day1.sh now takes the whole sensor name m00_b_ov9281 2-0060 |
| R25 | A fresh Radxa OS, step by step: every Radxa set-up and day-one step against a fresh image | 1 Nov 2026: done, sim/fresh-radxa-r25.mjs (23 checks): the driver build no longer stops on a compiler warning (the kernel stops on warnings and was built with an older compiler), the signed-call self-test gets its library, and set-up reads the overlay folder from the boot settings and says so if the overlay is not on |
| R26 | One results sheet for both boards: read both day-one packs and fill BRINGUP.md section 5 | next |